Common command
Perintah di command line yang sering digunakan untuk pengelolaan server
- 01 - Set ip address di linux
- 02 - Backup mysql
- 03 - Disk management di Ubuntu
- 04 - Belajar ganti logo openproject
- 05 - Kopi sertifikatt SSH agar tidak perlu login
- 06 - PosgreSQL
- 07 - Backup openproject
- 08 - IPTABLES prerouting
- 09 - Install latest Anaconda
- 10. Resize LVM Linux
- 11. Create Python Kernel in Jupyter Notebook
01 - Set ip address di linux
Seting network di linux ubuntu
Terdapat beragam command yang digunakan untuk melakukan pengaturan ip-address di linux, bergantung pada versi ubuntu yang kita miliki. Biasanya menggunkan perintah netplan apply atau bisa menggunakan ifup. Nah disini kita coba menggunakan perintah ip link set cara menggunakannha adalah sebagai berikut:
sudo ip link set ens18 upuntuk konfigurasi ip harus menggunakan role sudo, artinya harus sebagai superadmin, sedangkan perintah diatas digunakan untuk mengatur port ens18 agar berstatus up atau menyala. Perintah dibawah ini digunakan untuk meng-assign alamat ip addres ke port ens19.
sudo ip addr add <your_ip_address>/<your_subnet_mask> dev ens1902 - Backup mysql
Backup MySql database
Proses backup mysql database melalui command line di OS Ubuntu paling mudah dengan menggunakan mysqldump, cara penggunaannya sebagai berikut:
mysqldump -u [username] -p [nama_database] > [nama_file_backup.sql]-u |
diikuti dengan username mysql |
-p |
password mysql |
| nama database | |
> |
diikuti dengan nama backup *.sql |
03 - Disk management di Ubuntu
Proses management storage di server ubuntu sering menjadi kesulitan tersendiri bagi programer, mengingat pada saat instalasi Ubuntu biasanya hanya mengalokasikan space sebesar 200GB di partisi root nya, sehingga seiring bertambahanya file didalam storage, diperlukan managment disk untuk menambah dari partisi yang belum teralokasikan. Nah, di ubuntu terdapat command fdisk untuk menghandle kebutuhan tersebut.
fdiskadalah command tool yang sangat berguna untuk mengatur partisi di dalam linux. command ini dieksekusi dengan role sudo, karena merubah konfigurasi dari hardware.
Melakukan list seluruh partisi yang ada di ubuntu menggunakan perintah:
sudo fdisk -l
hasilnya adalah list sektor dari disk yang kita miliki, diatas terdata tiga device yang dimount yaitu /dev/sda1 , /dev/sda2 dan /dev/sda3. Terdapat juga informasi block memory, start block, end block, ukuran partisi dan tipe dari partisi data. Terdapat juga command lain untuk melihat partisi dari file kita yaitu df -h.
sudo df -h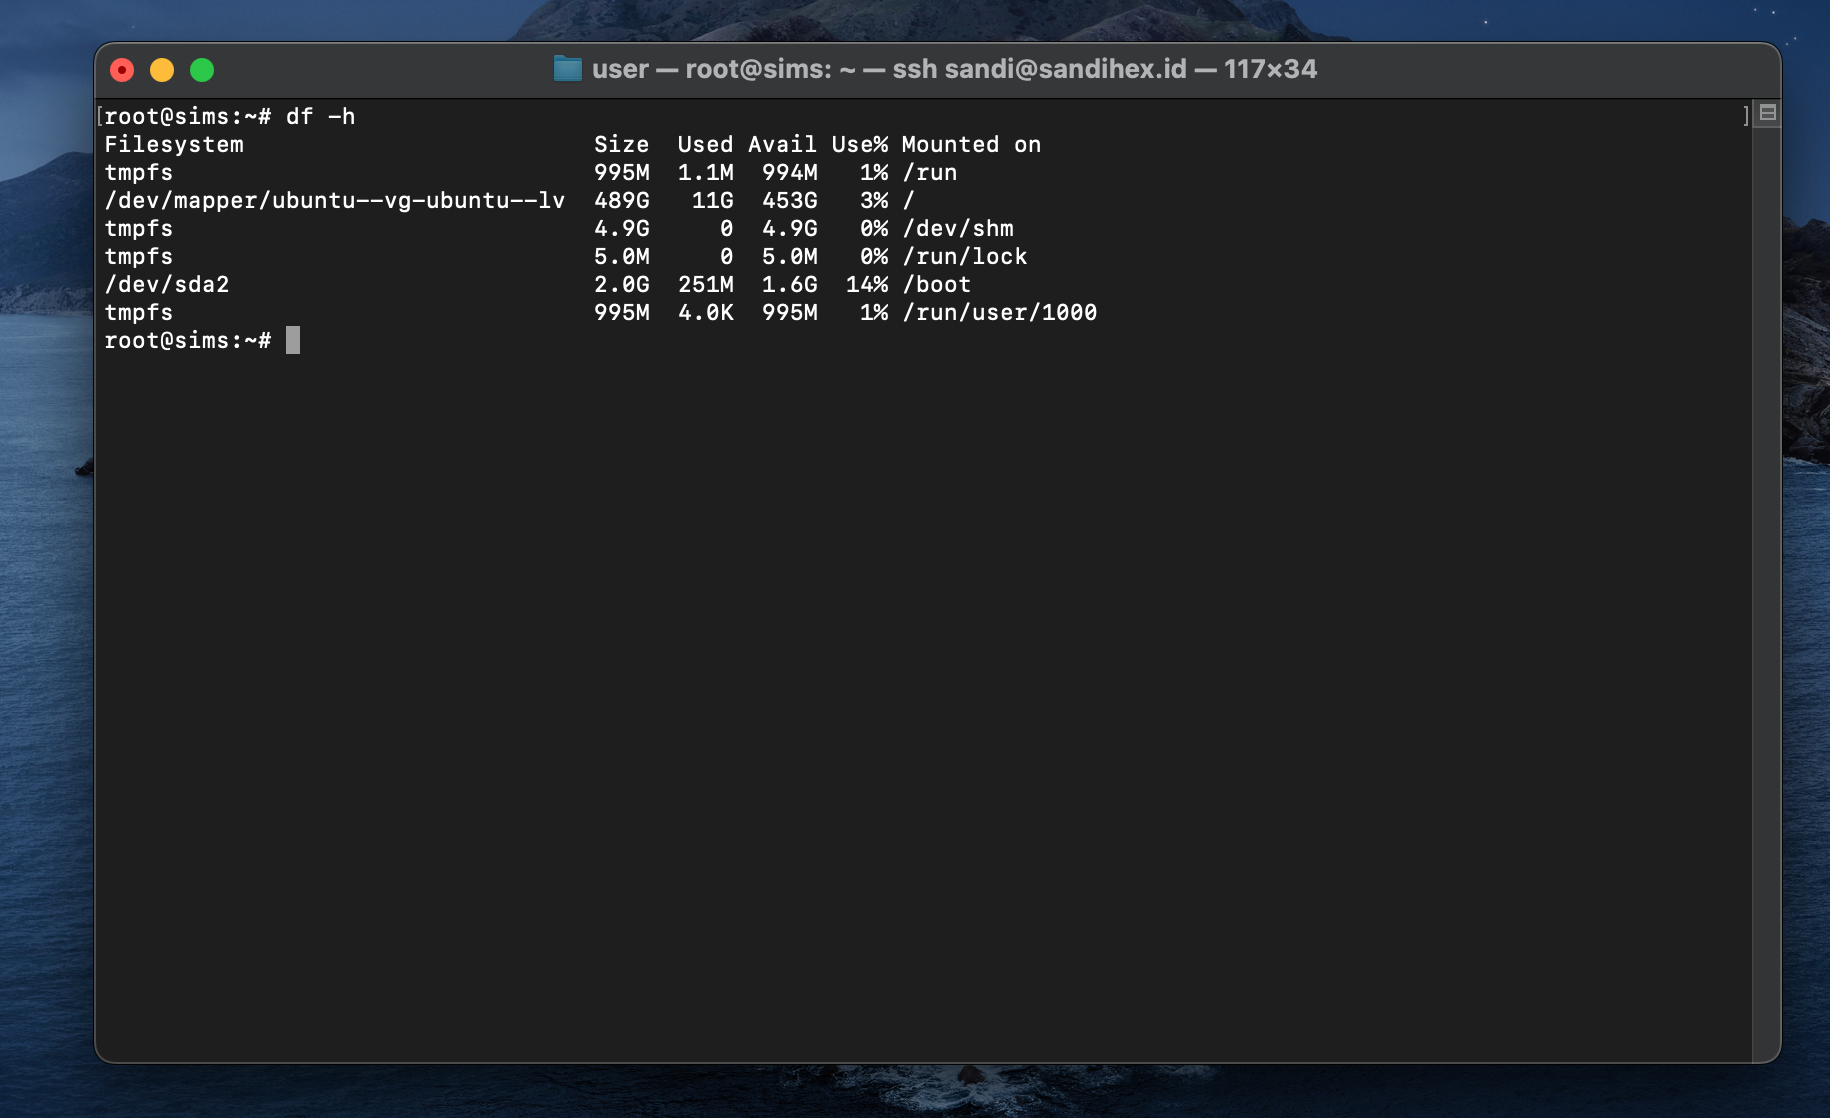
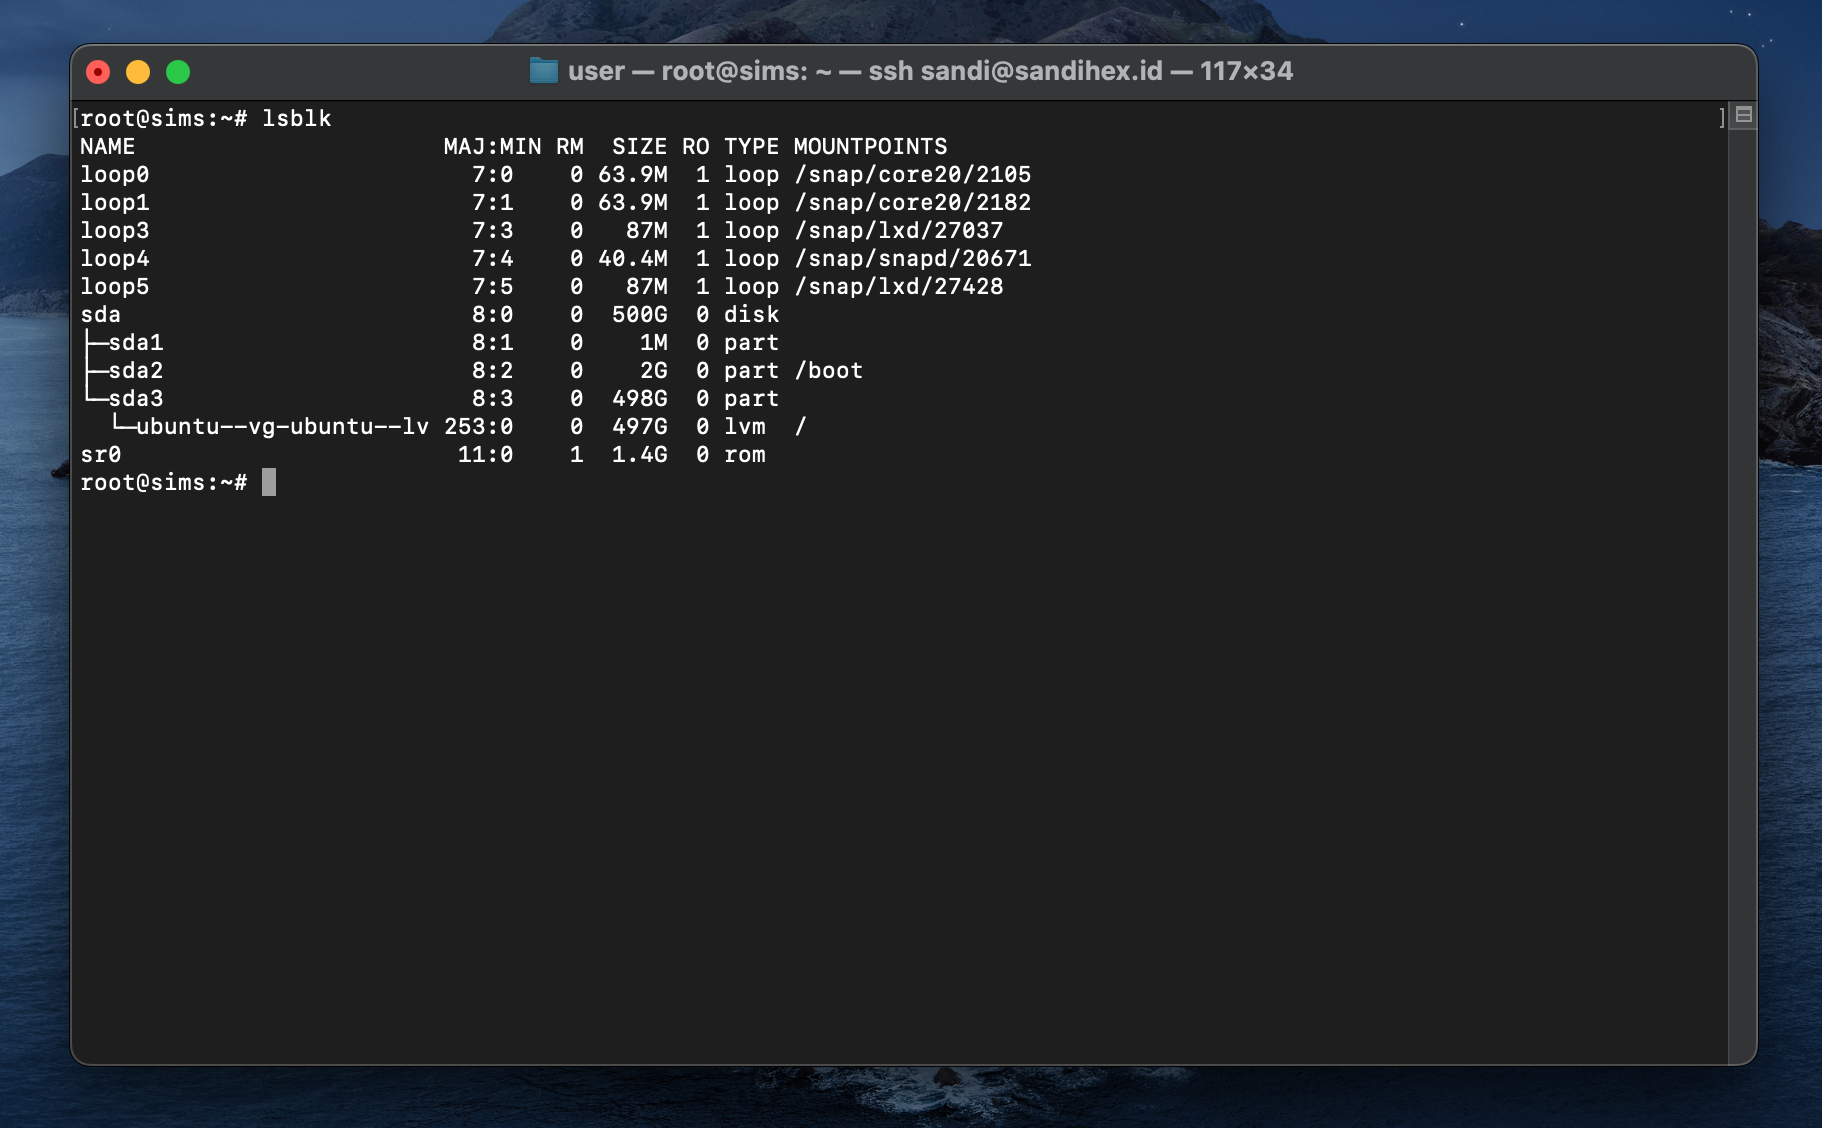
selain bebera perintah diatas, terdapat juga perintah untuk memberikan informasi list of block dari memory kita di ubuntu yaitu lsblk. seperti contoh berikut:
04 - Belajar ganti logo openproject
Berawal dari keinginan mengubah logo OpenProject menjadi logo custom (IFish-project), yang terjadi malah server blank selama 6 jam. Ingat Sandi, sebelum lakukan major changing lakukan snapshot untuk memudahkan rollback ketika ada error. Pusing juga ya 6 jam bergelut dengan aplikasi OpenProject yang tidak bisa diakses, sementara sedang akan digunakan besok. Hampir mual dan gak doyan makan.
Lalu apa sebenarnya masalahnya, ternyata karena perbedaan dependencies antara Node.js dan NPM, jadi setelah diganti logonya, harus di precompile, sementara NPM sudah auto update jadi tidak kompatibel lagi dengan Node.js. Pas precompile error, sementara output dari precompile ini adalah themes yang akan ditampilkan sebagai frontend. Akibatnya halaman menjadi putih bersih, tapi begitu di inspect dengan CTRL+Shift+i terindikasi semuanya missing. Ok, apa yang saya lakukan:
Langkah pertama | Downgrade versi NPM dan NODE.JS dengan perintah berikut, (Jodoh Node.JS versi 10.19.0 adalah NPM 6.14.14)
curl -o- https://raw.githubusercontent.com/nvm-sh/nvm/v0.39.1/install.sh | bashLangkah kedua | Install nvm, nvm adalah node version manager, tools mudah untuk mengelolan versi node.js yang akan digunakan.
nvm install 10.19.0Atur nvm untuk menggunanakan node.js versi 10. dengan perintah sebagai berikut:
nvm use 10.19.0Kemudian, insatll versi NPM sesuai dengan jodohnya yaitu versi 6.14.14
npm install -g npm@6.14.14Oke proses downgrade telah selesai, lanjut pekerjaan utama yang tertunda selama enam jam yaitu compile frontend openproject.
- Laksanakan prosedur kompiler dengan perintah:
openproject run rake assets:precompile. - Laksanakan prosesur stop service,
systemctl stop openproject. - Laksanakan proses configure, Ingat configure bukan re-configure.
openproject configure. - Jalankan service,
systemctl start openproject.
Apa itu Node.Js dan NPM?
Node.js: adalah platform runtime JavaScript yang dibangun di atas mesin JavaScript V8 dari Google Chrome. Node.js memungkinkan eksekusi kode JavaScript di luar browser, sehingga dapat digunakan untuk mengembangkan aplikasi server-side dan scripting di lingkungan server. Node.js menyediakan lingkungan yang efisien dan non-blocking, yang membuatnya cocok untuk menghadapi tugas berbasis I/O dan menjalankan server web, API, dan aplikasi lainnya.
npm (Node Package Manager): adalah manajer paket untuk Node.js. Ini adalah repositori publik yang memungkinkan pengembang JavaScript untuk berbagi dan mengelola paket kode JavaScript yang dapat digunakan dalam proyek mereka. Dengan npm, Anda dapat dengan mudah menginstal, mengelola, dan memperbarui dependensi atau paket yang diperlukan dalam proyek Node.js Anda. npm juga menyediakan alat untuk menjalankan skrip, mengelola proyek, dan memfasilitasi kolaborasi dalam pengembangan perangkat lunak.
Secara singkat, Node.js memberikan runtime JavaScript di sisi server, sementara npm adalah alat manajemen paket yang memungkinkan pengelolaan dependensi dan distribusi kode di ekosistem Node.js. Keduanya bekerja bersama untuk mendukung pengembangan aplikasi JavaScript yang efisien dan dapat diandalkan di berbagai platform.
05 - Kopi sertifikatt SSH agar tidak perlu login
ssh-copy-id -i ~/.ssh/id_rsa.pub ifish@ifish.mict.id
06 - PosgreSQL
PostgreSQL, or Postgres, is an object-relational database management system that uses the SQL language. It's free, open-source, reliable, robust, and performant. PostgreSQL is also one of the most popular & used relational databases.
psql is an interface you can access through the terminal to interact with Postgres databases. You can use it to connect to a database, add & read & modify data, check the available databases & fields, run commands from a file, and so on.
If you want to learn about Postgres commands or refresh your memory, you are in the right place! This article will teach you the top psql commands and flags you need to know when working with PostgreSQL.
1. Connect to a database - psql -d
The first step involves learning how to connect to a database. There are two ways to connect to a PostgreSQL database, depending on where the database resides.
Same host database
If the database is on the same host as your machine, you can use the following command:
psql -d <db-name> -U <username> -W

// example
psql -d tutorials_db -U admin -W
The above command includes three flags:
-d- specifies the name of the database to connect to-U- specifies the name of the user to connect as-W- forces psql to ask for the user password before connecting to the database
In this example, the command connects you to the tutorials_db under the admin user.
Different host database
In the cases where your database is hosted somewhere else, you can connect as follows:
psql -h <db-address> -d <db-name> -U <username> -W

//example
psql -h my-psql-db.cloud.neon.tech -d tutorials_db -U admin -W
The -h flag specifies the host address of the database.
SSL mode
There might be cases where you want to use SSL for the connection.
psql "sslmode=require host=<db-address> dbname=<db-name> user=<username>"

//example
psql "sslmode=require host=my-psql-db.cloud.neon.tech dbname=tutorials_db user=admin"
The above command opens an SSL connection to the specified database.
2. List all databases - \l
In many cases, you will work with more than one database. You can list all the available databases with the following command:
\l
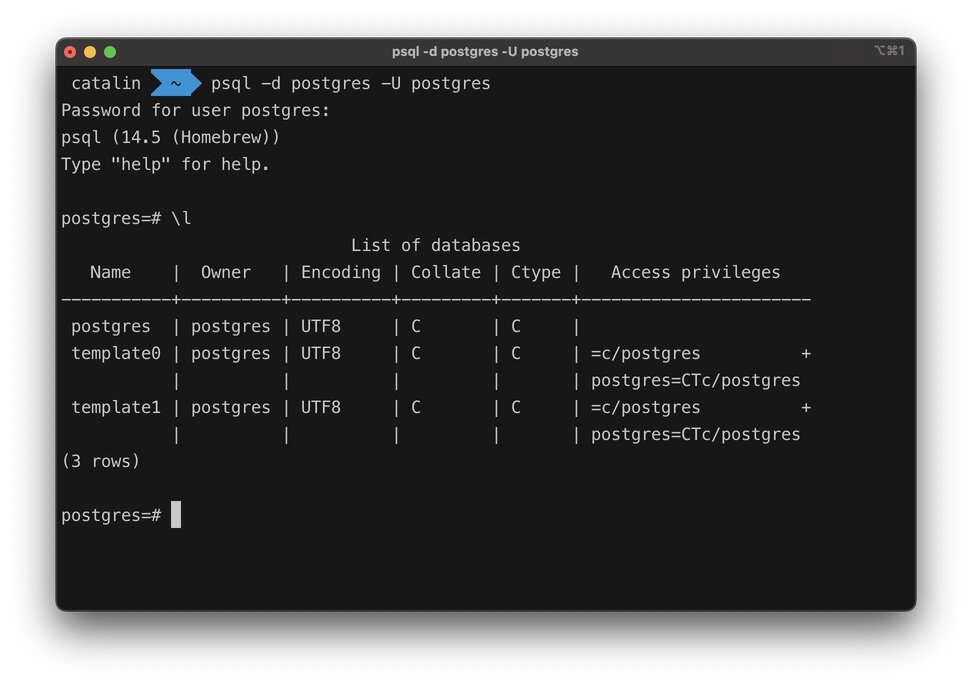
The above image illustrates what happens when you run the command. You get a table with all databases and their name, owner, access privileges, and other information.
3. Switch to another database - \c
You can also switch to another database with the following command:
\c <db-name>

// example
\c tutorials_db
The below image illustrates the result after running the command.
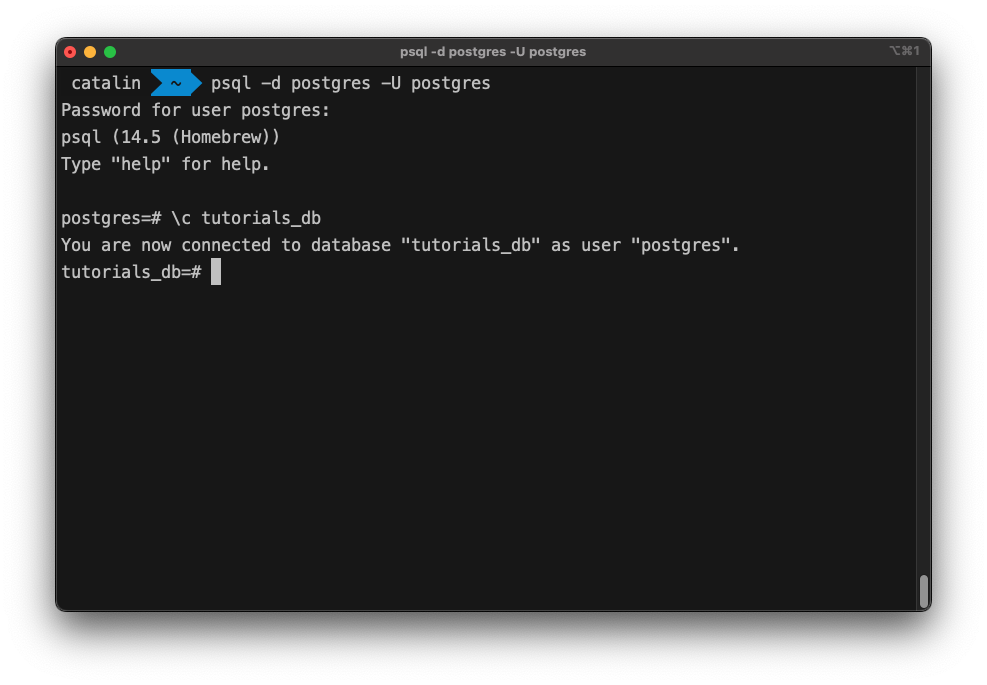
The command switches to the specified database under the user you logged in previously.
4. List database tables - \dt
Let's consider you want to see all the tables from the database. You can list all database tables as follows:
\dt
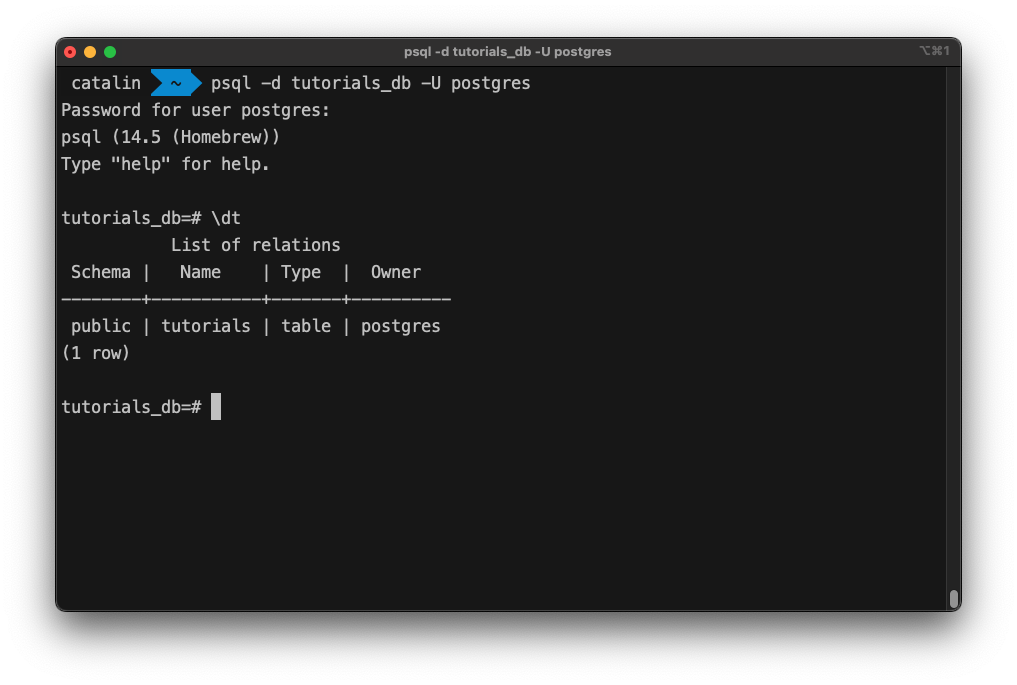
The \dt psql command returns the tables alongside:
- the schema they belong to
- their type
- their owner
5. Describe a table - \d
psql also has a command that lets you see the table's structure.
\d <table-name>

// example
\d tutorials
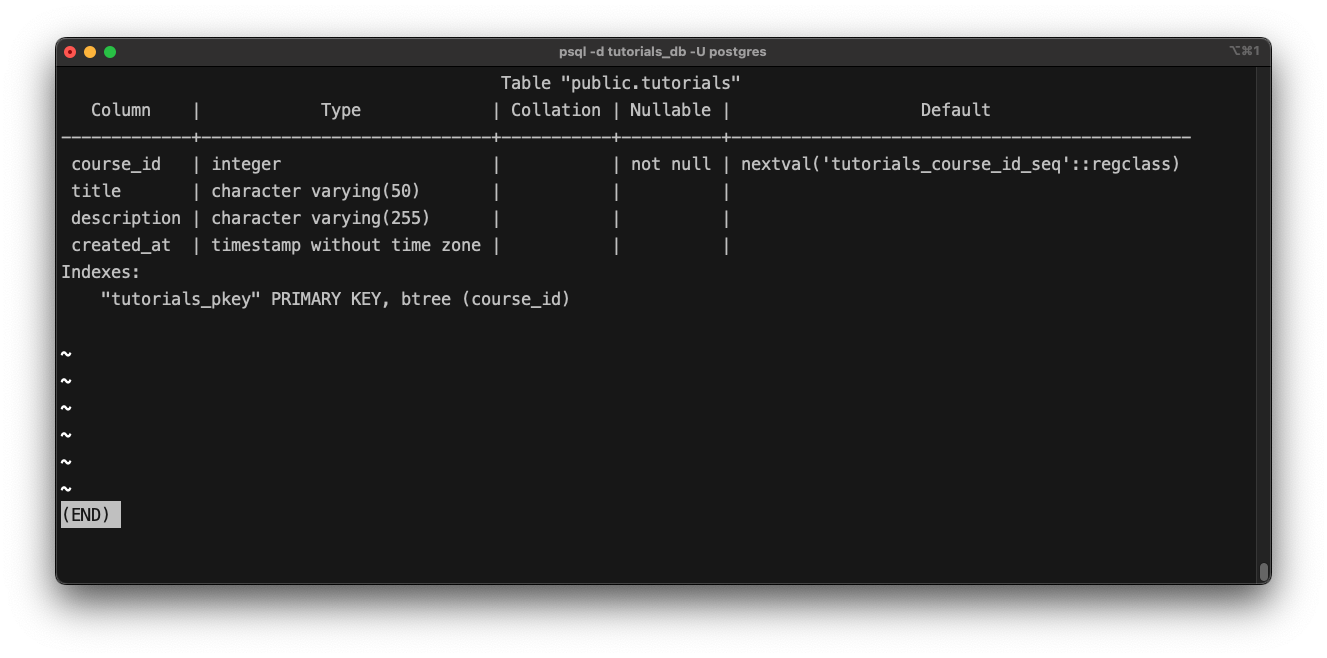
The \d command returns all the columns, their types, collection, whether they are nullable or not, and their configured default value.
If you want more information about a table, you can use the command:
\d+ <table-name>
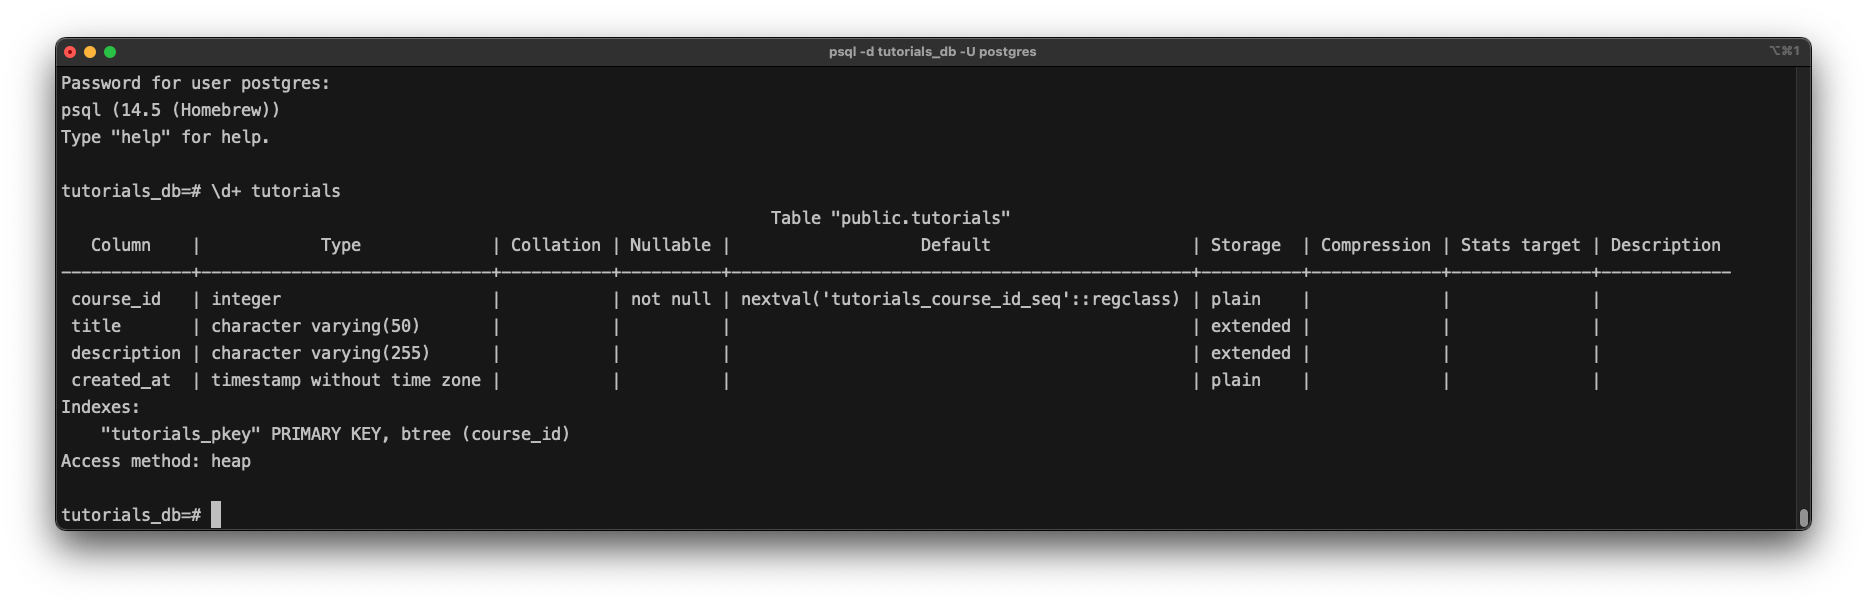
Now, you get extra information such as storage, compression, stats target, and a description.
6. List all schemas - \dn
The \dn psql command lists all the database schemas.
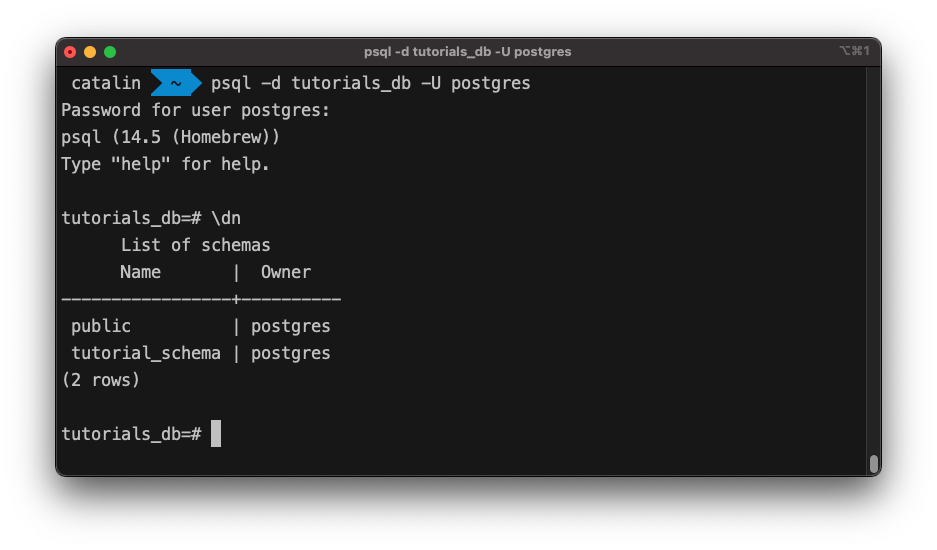
It returns the name of the schemas and their owners.
7. List users and their roles - \du
Sometimes, you might need to change the user. Postgres has a command that lists all the users and their roles.
\du
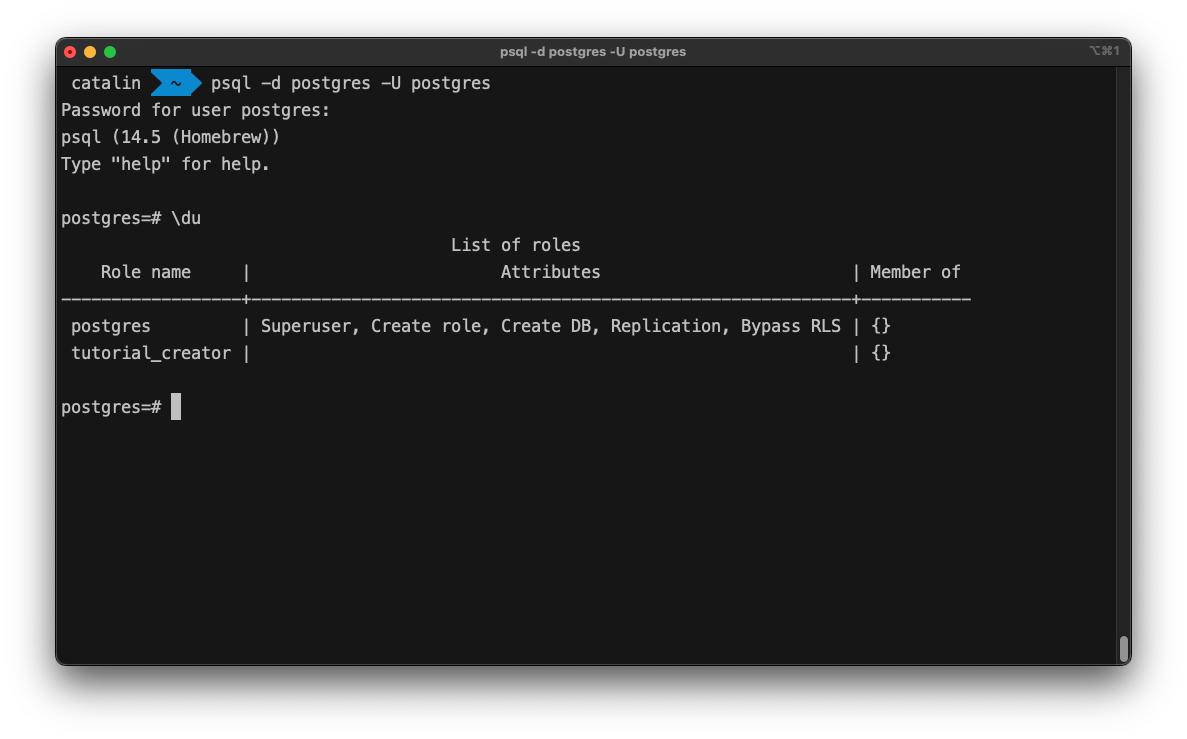
As the image shows, the command returns all the users.
8. Retrieve a specific user - \du
You can also retrieve information about a specific user with the following command:
\du <username>

//example
/du postgres
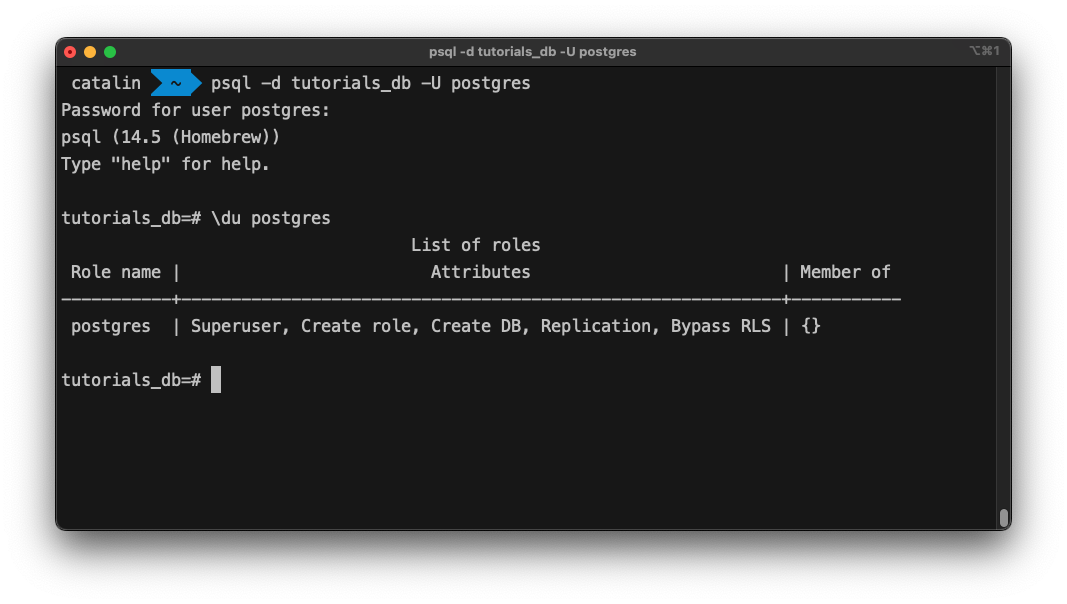
Now, you can see the roles of the specified user, and whether the user is a member of a group or not.
9. List all functions - \df
You can list all the functions from your database with the \df command.
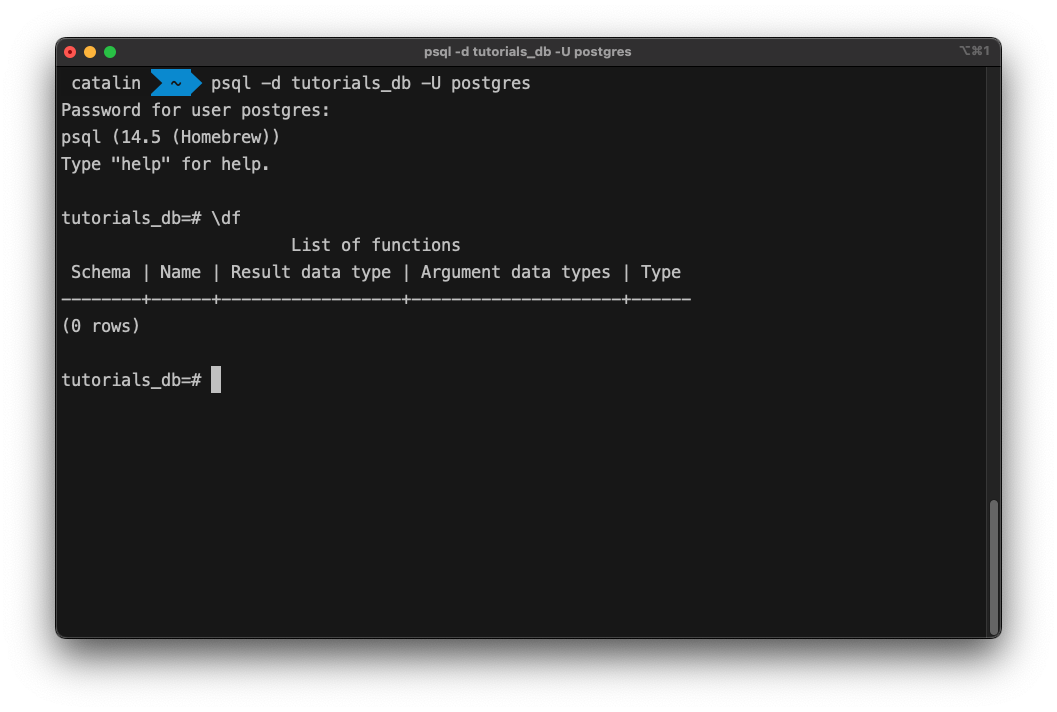
The command returns all functions and the:
- schema they belong to
- names
- result data type
- argument data types
- type
10. List all views - \dv
The psql interface enables you to list all the database views with the \dv command.
11. Save query results to a file - \o
There might be cases where you want to analyze the result of a query at a later time. Or two compare two query results. The psql interface allows you to do that.
You can save query results in a file as follows:
\o <file-name>

// example
\o query_results
...run the psql commands...
\o - stop the process and output the results to the terminal again
Let's save the following query results in a file:
- the available database tables
- the result of describing a database table
- the list of all users
- the details of the user "postgres"
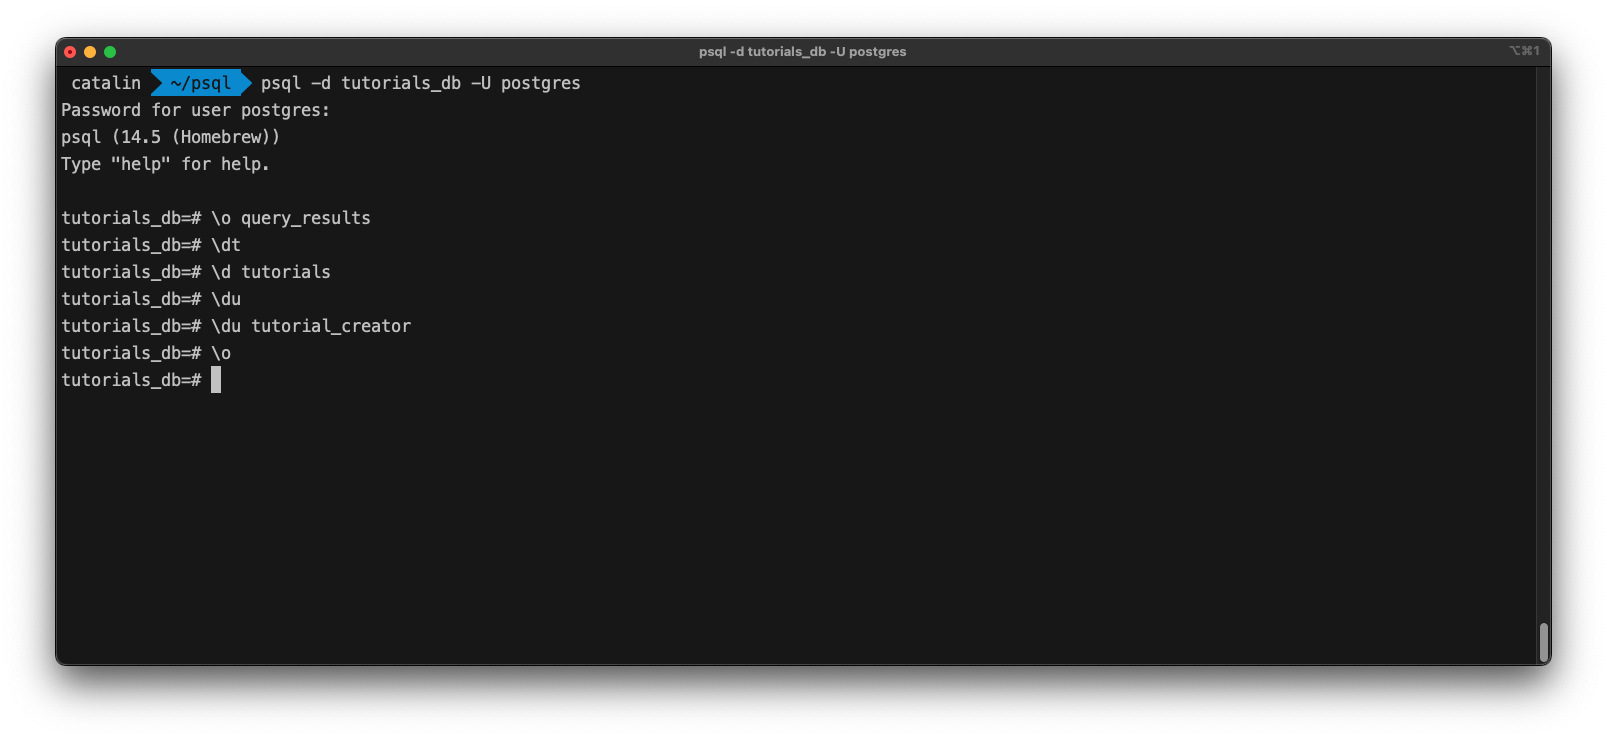
Note: To stop saving results to the file, you need to run the \o command again without the file name.
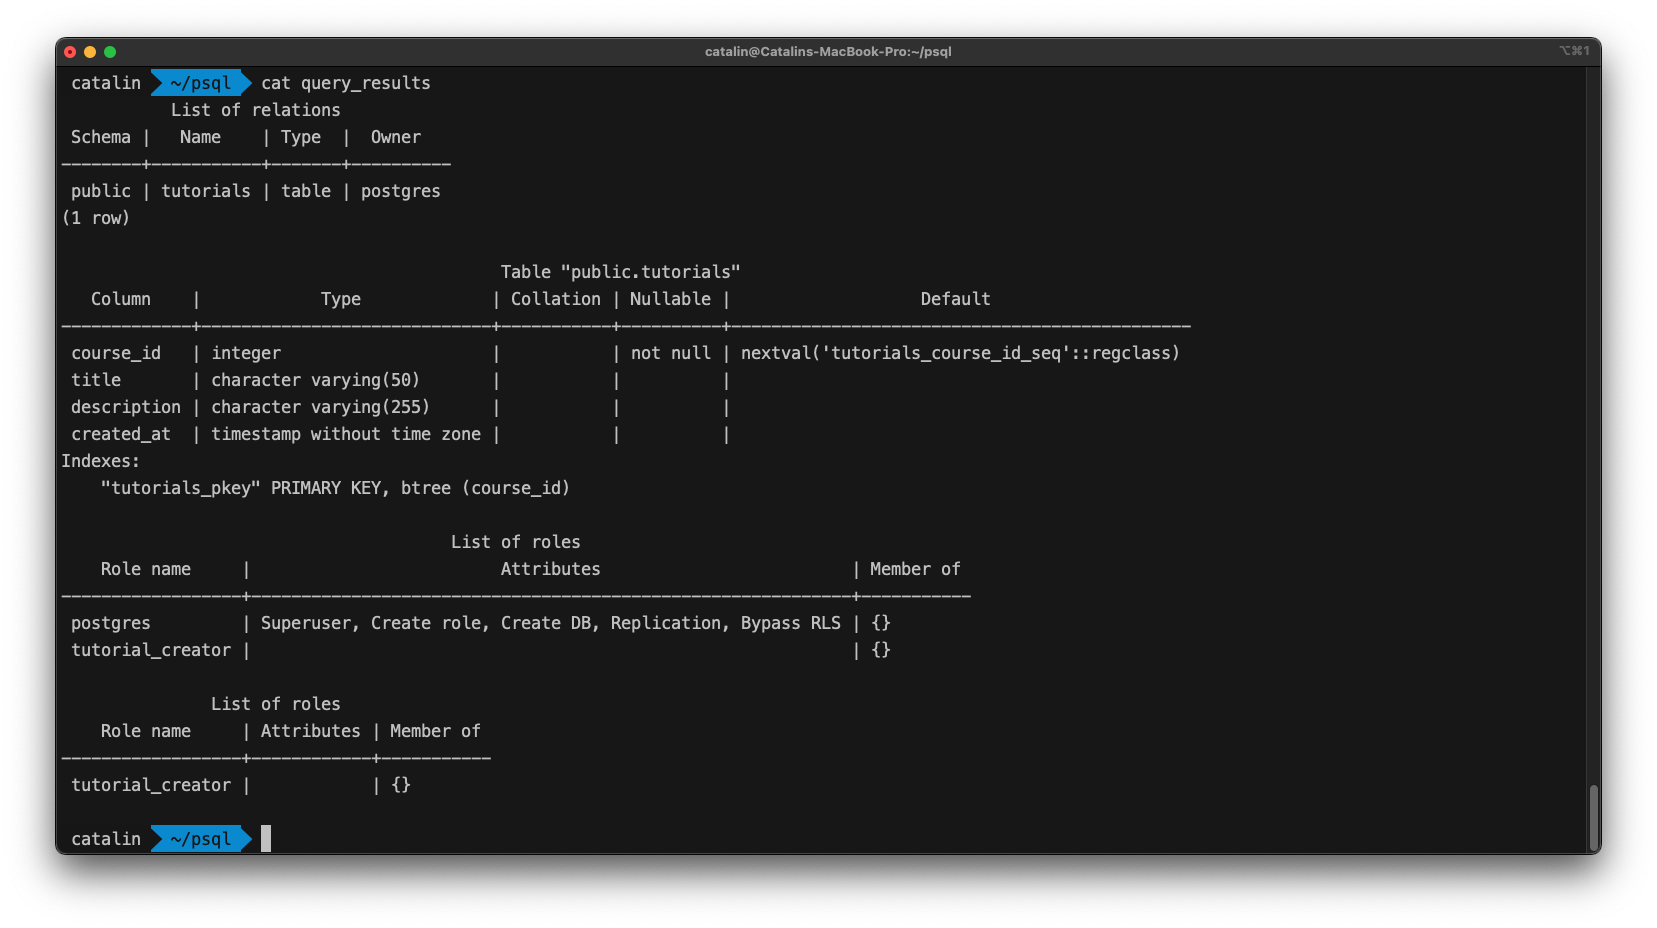
The above image illustrates the file containing all the query results.
12. Run commands from a file - \i
It's also possible to run commands from a file. For simple commands, it might not be the best solution. But when you want to run multiple commands and complex SQL statements, it helps a lot.
Create a txt file with the following content:
\l
\dt
\du
When you run the file, it should return a list of all:
- databases
- database tables
- users
You can run commands from a file with the following psql command:
\i <file-name>

// example
\i psql_commands.txt
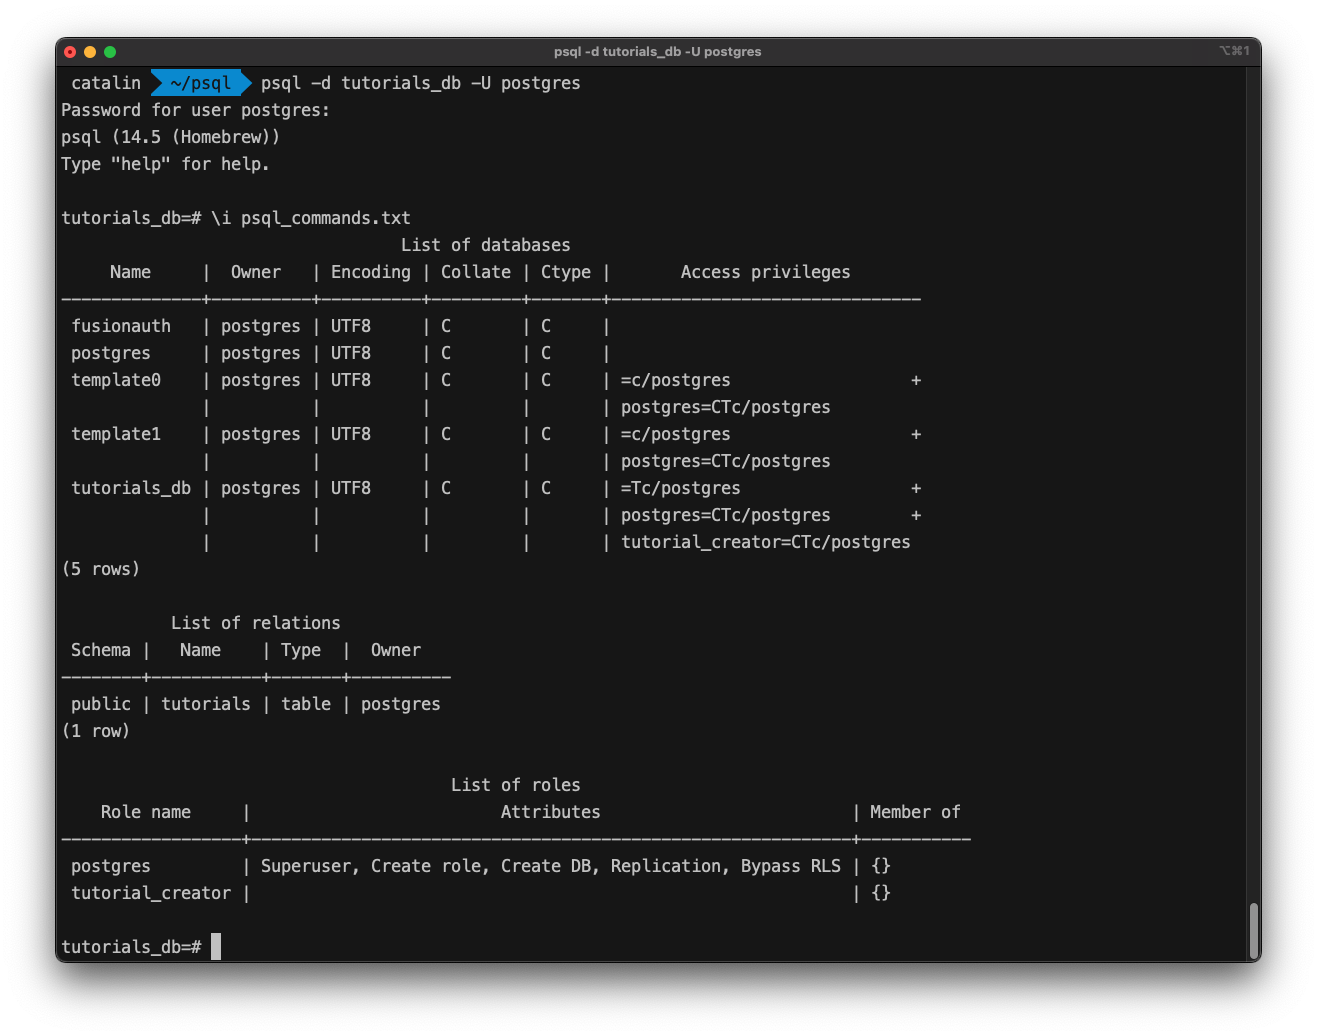
The command returned all the databases, tables, and users as expected.
Quit psql - \q
You quit the psql interface with the \q command.
Get APIs instantly for PostgreSQL
All the above commands with psql are great to connect to PostgreSQL on the commandline for direct access and execution of operations. But in case you are looking to build APIs for data access on Postgres, you should check out Hasura. Hasura connects to your existing or new PostgreSQL database, introspects the schema(s) and lets you generate CRUD APIs in GraphQL and REST declaratively in minutes. Read more here to get started with Hasura and PostgreSQL.
Note: Any flavor of Postgres which is wire compatible will work with Hasura.
Summary
The psql interface is powerful and allows you to do many things, including running SQL statements. If you want to get started with PostgreSQL or deepen your knowledge, check out our PostgreSQL Tutorial. You can also check out the Postgre articles on our blog.
If you are looking for options to host your Postgres database, check these PostgreSQL hosting options.
07 - Backup openproject
Backing up your OpenProject installation
We advise to backup your OpenProject installation regularly — especially before upgrading to a newer version.
What should be backed up
In general the following parts of your OpenProject installation should be backed up:
- Data stored in the database
- Configuration files
- Uploaded files (attachments)
- Repositories (subversion, git) if applicable
Package-based installation (DEB/RPM)
The DEB/RPM packages provide a backup tool which can be used to take a snapshot of the current OpenProject installation. This tool will create a backup of all parts mentioned above. The backup tool is invoked by executing the following command:
sudo openproject run backup
The command will create backup files in the following location on your system:
/var/db/openproject/backup
The content of that directory should look very similar to the following.
root@ip-10-0-0-228:/home/admin# ls -al /var/db/openproject/backup/
total 1680
drwxr-xr-x 2 openproject openproject    4096 Nov 19 21:00 .
drwxr-xr-x 6 openproject openproject    4096 Nov 19 21:00 ..
-rw-r----- 1 openproject openproject 1361994 Nov 19 21:00 attachments-20191119210038.tar.gz
-rw-r----- 1 openproject openproject    1060 Nov 19 21:00 conf-20191119210038.tar.gz
-rw-r----- 1 openproject openproject     126 Nov 19 21:00 git-repositories-20191119210038.tar.gz
-rw-r----- 1 openproject openproject  332170 Nov 19 21:00 postgresql-dump-20191119210038.pgdump
-rw-r----- 1 openproject openproject     112 Nov 19 21:00 svn-repositories-20191119210038.tar.gz
You should then copy those dump files to a secure location, for instance an S3 bucket or some sort of backup server.
Docker-based installation
If you are using docker-compose, then the data volumes are managed by Docker and you should have a look at the official Docker documentation for instructions on how to backup.
If you are using the all-in-one container, then you can simply backup any local volumes that you chose to bind-mount with the -v option when launching the container. For instance if you launched the container with:
sudo mkdir -p /var/lib/openproject/{pgdata,assets}

docker run -d -p 8080:80 --name openproject -e SECRET_KEY_BASE=secret \
  -v /var/lib/openproject/pgdata:/var/openproject/pgdata \
  -v /var/lib/openproject/assets:/var/openproject/assets \
  openproject/community:13
Then you would need to backup the /var/lib/openproject folder (for instance to S3 or FTP server).
Dumping the database
When using docker-compose you can simply dump the database from the database container.
docker exec -it db_1 pg_dump -U postgres -d openproject -x -O > openproject.sql
This assumes that the database container is called db_1. Find out the actual name on your host using docker ps | postgres.
All-in-one container
If you need a regular dump of the database you can get one using pg_dump like this:
docker exec -it $OP_CONTAINER_NAME su - postgres -c 'pg_dump -d openproject -x -O' > openproject.sql
Where $OP_CONTAINER_NAME is the name of your OpenProject container. If you don’t know it you can find it using docker ps | grep openproject.
Importing the dump into a new container
Follow the instructions in the restoring section to import a dump into a new container.
08 - IPTABLES prerouting
Memasukan iptables dalam reverse-proxy:
sudo iptables -t nat -A PREROUTING -p tcp --dport 8001 -j DNAT --to-destination 10.1.1.4:21Membaca list iptables dalam server linux:
iptables -t nat -LMelakukan penghapusan pada pengaturan iptables -t nat -D lengkapnya:
sudo iptables -t nat -D PREROUTING -p tcp --dport 8001 -j DNAT --to-destination 192.168.1.100:2109 - Install latest Anaconda
Download insatller dalam format bash melalui link berikut.
curl -O https://repo.anaconda.com/archive/Anaconda3-2024.02-1-Linux-x86_64.shBuat installer ini menjadi file excutable:
sudo chmod +x Anaconda3-2024.02-1-Linux-x86_64.shruning installer dengan perintah
./Anaconda3-2024.02-1-Linux-x86_64.shMake Jupyter Notebook acces remotely
jupyter notebook --generate-config10. Resize LVM Linux
To mount sdb to an LVM (Logical Volume Manager) on Linux, you'll first need to prepare the disk and create the necessary partitions and volumes. Here's a step-by-step guide:
-
Partition the disk (
sdb): You can use a partitioning tool likefdiskorpartedto create partitions onsdb. For example, you can create a single partition spanning the entire disk.bashsudo fdisk /dev/sdbThen follow the prompts to create a new partition (
n), choose primary partition, select the default partition number, and use the entire disk (+1T). -
Create a Physical Volume (PV): After partitioning, you need to initialize the partition as a physical volume for LVM.
bashsudo pvcreate /dev/sdb1 -
Extend the Volume Group (VG): If you want to extend an existing volume group, you can use
vgextend. If you want to create a new one, you can usevgcreate. For extending an existing VG, you might have to check its name.bashsudo vgextend ubuntu-vg /dev/sdb1Replace
ubuntu-vgwith the name of your volume group. -
Create a Logical Volume (LV): Once the volume group is extended, you can create a logical volume within it.
perlsudo lvcreate -l 100%FREE -n sdb-lv ubuntu-vgThis creates a logical volume named
sdb-lvusing all available space in the volume groupubuntu-vg. -
Format the Logical Volume: You'll need to format the newly created logical volume with a file system. Replace
ext4with your desired file system type.bashsudo mkfs.ext4 /dev/ubuntu-vg/sdb-lv -
Mount the Logical Volume: Create a mount point and mount the logical volume.
bashsudo mkdir /mnt/sdb sudo mount /dev/ubuntu-vg/sdb-lv /mnt/sdbNow your
sdbdisk should be mounted to/mnt/sdbas an LVM.
Remember to replace volume group and logical volume names (ubuntu-vg and sdb-lv respectively) with your actual ones. Also, ensure you understand the implications of these operations on your system before proceeding.
Resize
lvextend -l +100%FREE /dev/ubuntu-vg/ubuntu-lvEksekusi perubahan
resize2fs /dev/mapper/ubuntu–vg-ubuntu–lv11. Create Python Kernel in Jupyter Notebook
Python kernel jupyter notebook
python -m ipykernel install --user --name pytorch-env --display-name "Python (pytorch-env)"